The Users & Building Access area of the new Portal allows authorised users to view and manage users for a customer, update user profiles and roles, control building access, manage authentication, and import multiple users.
Who can use this Feature?
- Standard + Estate Manager
- Admin
- Tech Admin
Accessing user management
- Select Estate from the main navigation menu.
- Open Users & Building Access.
- Find the required customer.
- Select the customer to view the users associated with that account.
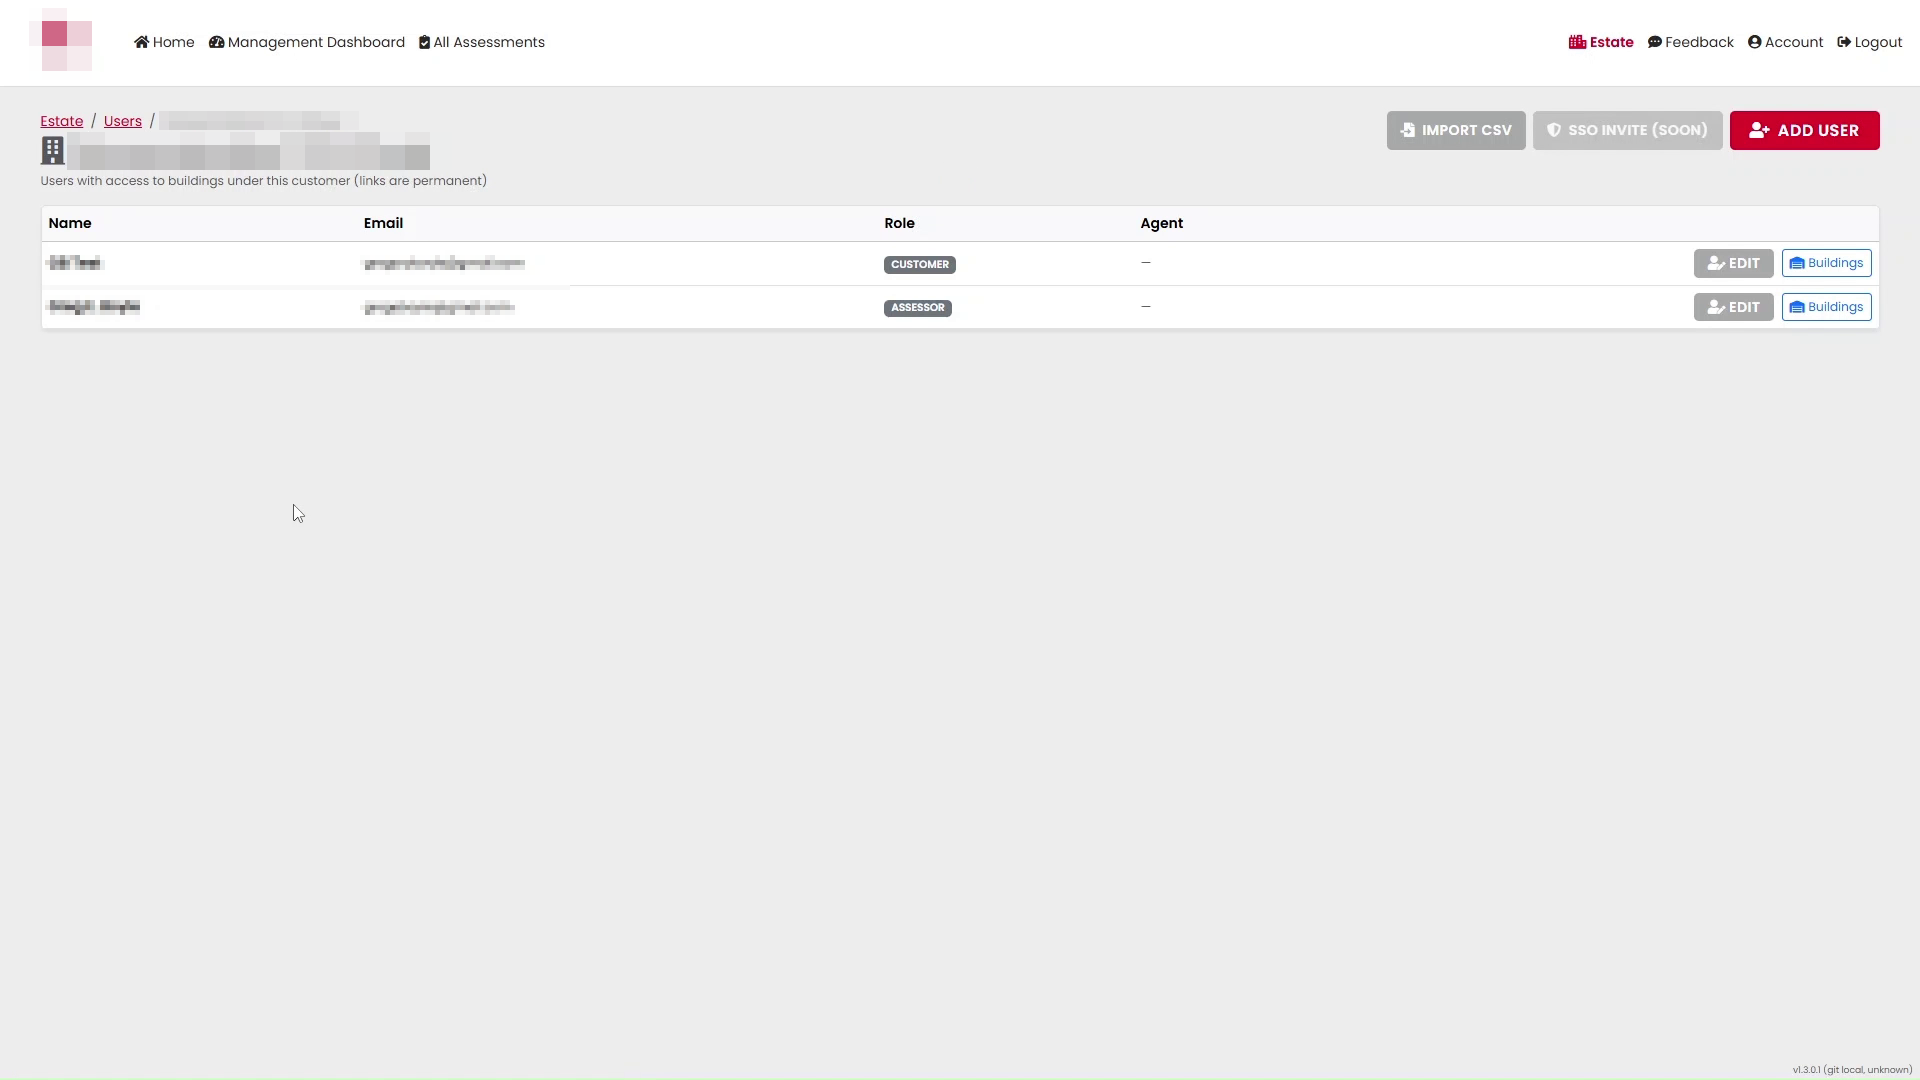
The customer’s user list displays each user’s:
- Name
- Email address
- Role
- Agent information, where applicable
From this page, you can add a user, edit an existing user, manage building access, or begin a CSV import.
Note: The options available may depend on your permissions within the Portal.
Adding an individual user
To add a user manually:
- Open the required customer’s user list.
- Select Add User.
- Enter the user’s details.
- Select the appropriate role and any additional options displayed.
- Save the user.
After the user has been created, their profile, authentication and building access can be managed from the customer’s user list.
Editing an existing user
- Locate the required user in the customer’s user list.
- Select Edit.
- Update the required information.
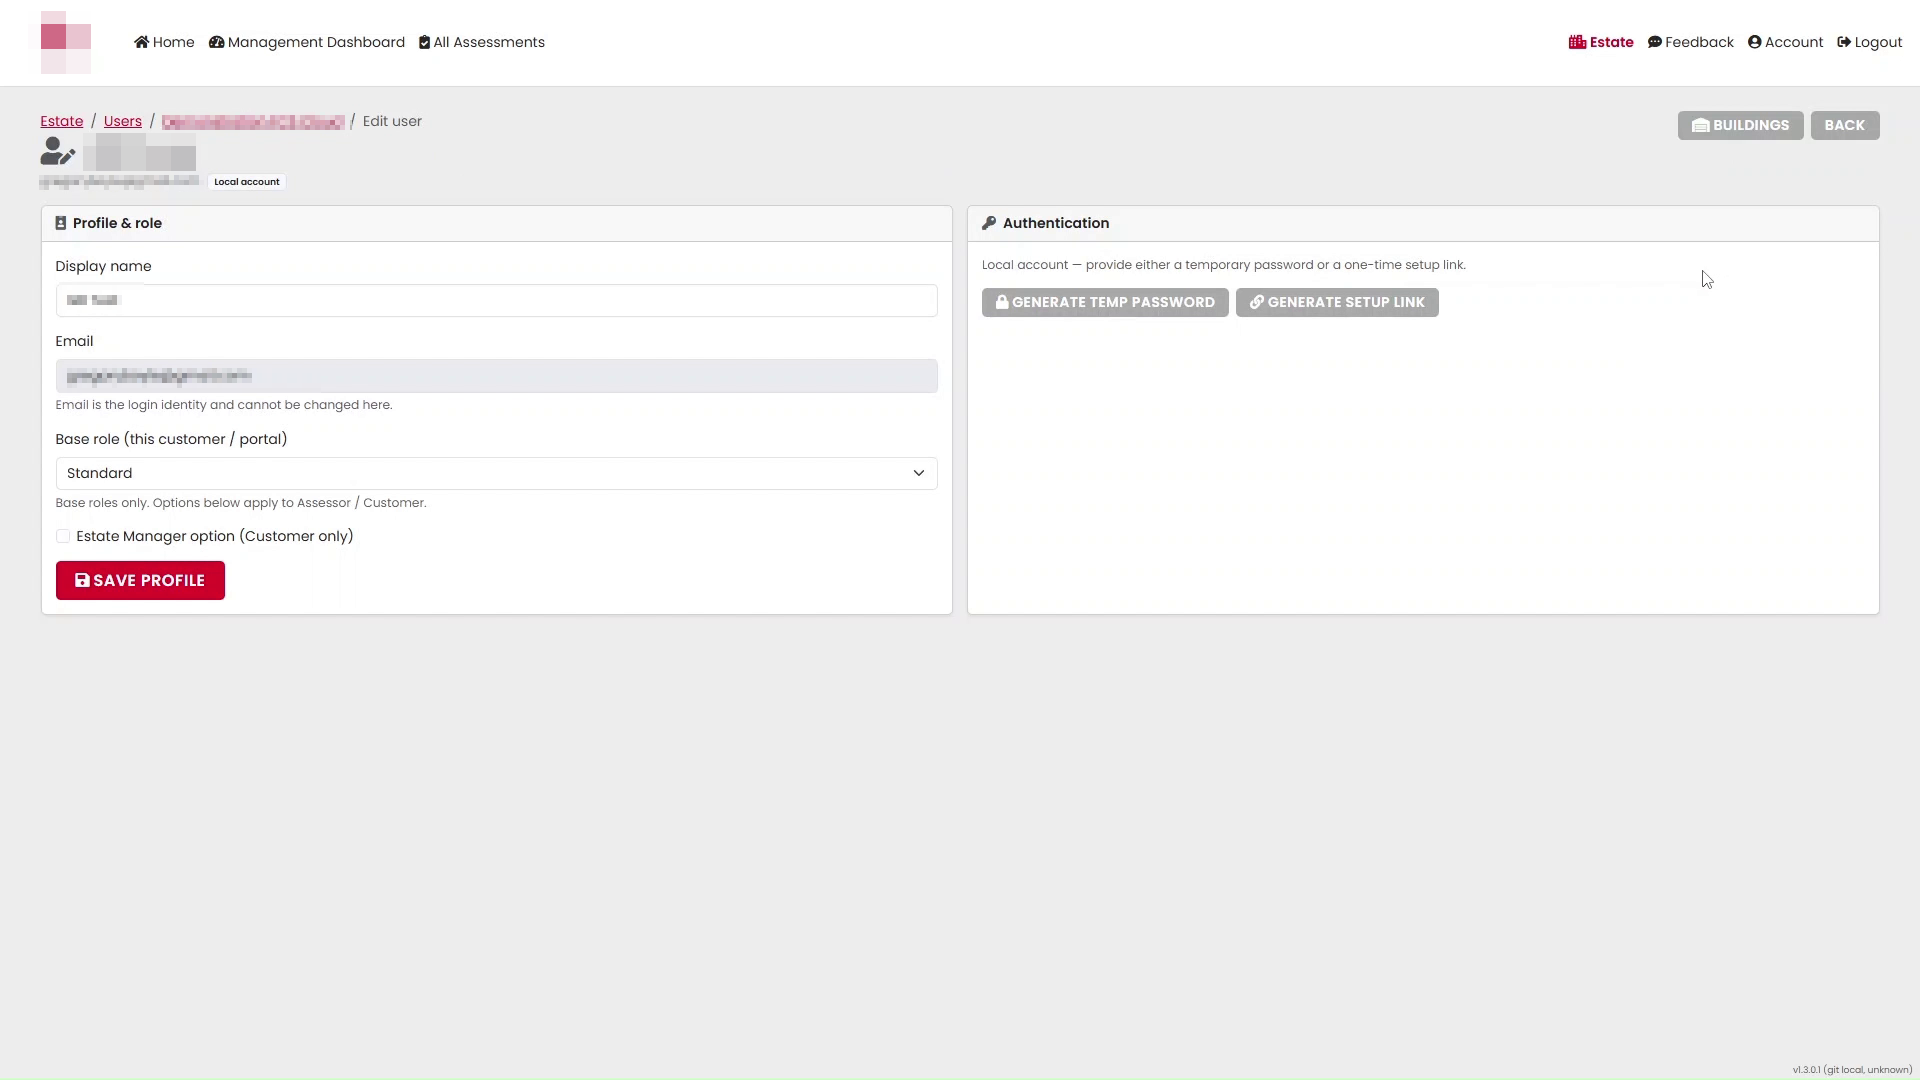
The user profile includes the following information:
- Display name
- Base role
- Estate Manager option, where applicable
The email address is used as the user’s login identity and cannot be changed from the edit page.
Select Save Profile after making changes.
Managing a user’s role
The Base role list is used to select the user’s role for the relevant customer and Portal.
Where available, the Estate Manager option can also be enabled for a customer user.
After changing the user’s role or options, select Save Profile.
Important: Only assign the permissions required for the user’s responsibilities.
Managing authentication
For a user shown as a Local account, the Authentication section provides two options:
- Generate Temp Password
- Generate Setup Link
A temporary password can be generated for the user, or a one-time setup link can be created so that the user can complete account setup.
Handle temporary passwords and setup links securely and provide them only to the intended user.
Managing building access
Building access determines which buildings under the selected customer are assigned to the user.
To manage access:
- Find the user in the customer’s user list.
- Select Buildings.
- Use the checkboxes to select or deselect buildings.
- Select Save Access.
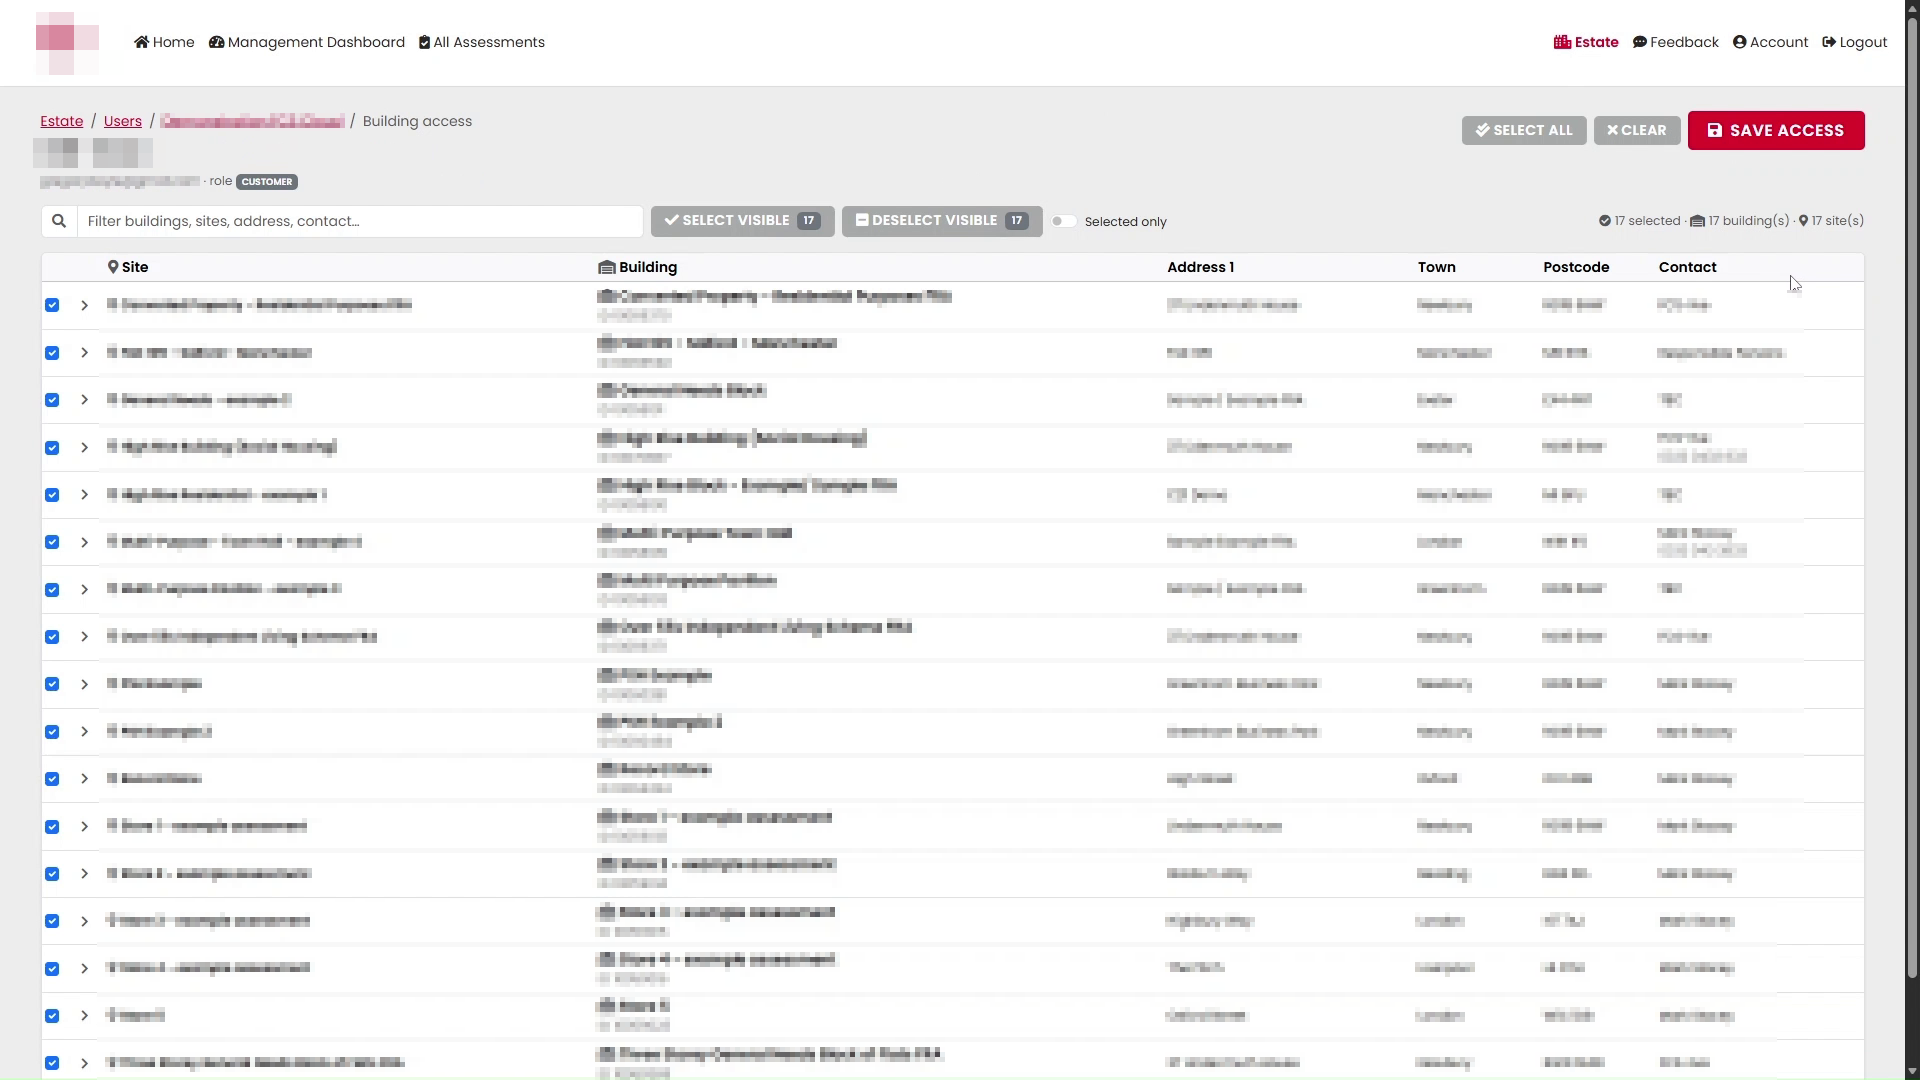
The building access page displays information including:
- Site
- Building
- Address
- Town
- Postcode
- Contact
Finding buildings
Use the search field to filter the list by building, site, address or contact.
The Selected only option can be used to show the buildings currently selected for the user.
Selecting or clearing access
The following controls are available:
- Select All selects all buildings.
- Clear clears the current selection.
- Select Visible selects the buildings currently shown by the filter.
- Deselect Visible deselects the buildings currently shown by the filter.
The page also displays the current number of selected buildings and sites.
After completing the selection, select Save Access.
Important: Changes are not saved until Save Access is selected.
Importing multiple users
The import function can be used to upload users from a CSV or text file.
To open the import page:
- Open the required customer’s user list.
- Select Import CSV.
The import page allows you to choose a file format and upload a file for review.
Supported file types
The Portal accepts:
.csv.txt
The maximum file size displayed is 512 KB.
Available import formats
The format options shown include:
- Emails only, with one email address per line
- Email and role, with an optional header
When importing email addresses and roles, the roles shown as accepted are:
CUSTOMERVIEWONLYADMINASSESSOR
Preparing an emails-only file
Create a CSV or text file containing one email address on each line.
Example:
user1@example.comuser2@example.com
user3@example.com
Preparing an email-and-role file
Enter the user’s email address and role in the format displayed on the import page:
email,roleuser1@example.com,CUSTOMER
user2@example.com,ASSESSOR
An optional header can be included.
Uploading the file
- Select the required option from the Format list.
- Select Choose File.
- Locate and select the CSV or text file.
- Select Review identities.
The Portal reviews entries by domain and identifies well-known domains, uncommon domains and likely misspellings. Review the results carefully before proceeding.
The import process allows you to choose which users to import and send each selected user an invitation containing a unique setup link.
Troubleshooting
The Review identities button is unavailable
Check that a CSV or text file has been selected.
A user’s email address needs to be changed
The email address is the user’s login identity and cannot be changed from the edit-user page. Follow the appropriate account-management process for your organisation.
A user cannot access a building
Open the user’s Buildings page and check that the required building is selected. If you make a change, select Save Access.
Imported users have not appeared
Check the status information displayed on the import page and review the uploaded file for invalid email addresses, unsupported roles or formatting errors.
An import file is rejected
Confirm that:
- The file is in
.csvor.txtformat. - The file does not exceed 512 KB.
- Each entry follows the selected import format.
- Any roles use one of the accepted role values.
Summary
The user-management area allows authorised users to:
- View users associated with a customer
- Add individual users
- Edit user profiles and roles
- Generate temporary passwords or setup links for local accounts
- Control access to individual buildings
- Import multiple users from a CSV or text file
Next
The above steps are covered in more detail in Estate Management.
Was this article helpful?
That’s Great!
Thank you for your feedback
Sorry! We couldn't be helpful
Thank you for your feedback
Feedback sent
We appreciate your effort and will try to fix the article